The ip4200 has the ability to print double-sided without the traditional take-out-and-flip-over style. Not intended for huge volumes, which Kathy seems to generate at times.
The problem was "Error code 6A00" which pops up with 2 choices - turn off/on, or send out for service. The first choice didn't work, and the latter was unpalatable.
Searching the internet showed 2 threads:
http://www.fixyourownprinter.com/forums/inkjet/39177 - "Canon PIXMA MP800 Error 6A00"
and
http://www.fixyourownprinter.com/forums/inkjet/37440 - "canon Pixma ip4000 error - 6A00"
And a photo series:
http://rs126gc2.rapidshare.com/files/96847457/200634/Canon_A600_Problem.jpg
Both go back 2 years, with plenty of wailing, gnashing of teeth and occasional victory W00Ts.
Our model is the iP4200, but the internal print head and ink handling seem identical to the other stories.
Photo 1 is the location of 2 the 4 tabs I eventually found to remove the top cover. Some folks have managed to repair theirs without doing this (but not me).
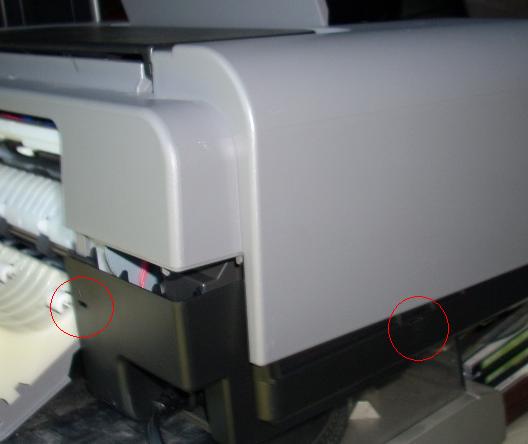
After taking it off and putting it back on a few times, I was getting better at it. First, push in the tabs along the back side, prying up that edge of the case. Then, push in each side, pulling upwards on the opening crack shown. I never found an easy way to remove the front edge, so I have no useful advice there.
One poster said to remove the small front corner covers first. I think that's the right way to go, as you will see below.
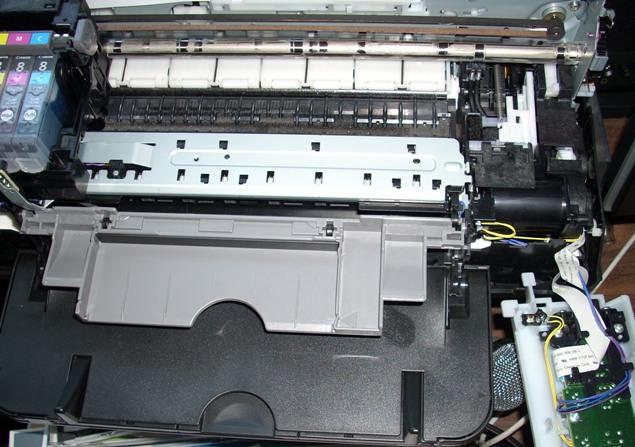
The next photo shows the inside of the printer. The printhead/ink trolley has been pushed to the far left side. The problem area is on the opposite side from that trolley -- follow down the black ribbed area to 2 small gray rectangles. They are the pads/sponges/wipes that, if not functional, seem to cause the 6A00 error codes. Anything else in the path of that trolley will also cause a fault, from what I've read.
I know that our printer seemed to take longer and longer to start over the weeks and months prior to the startup fault, but there is no helpful early warning diagnostic (like an oil change light).
You probably can't see it very well, but I caused a problem in the right front panel getting the thing off, probably on the first try. Be cautious with that module, as the ribbon cable looks like cellophane tape, and the 2 protruding micro-switches are similarly on the thin side.
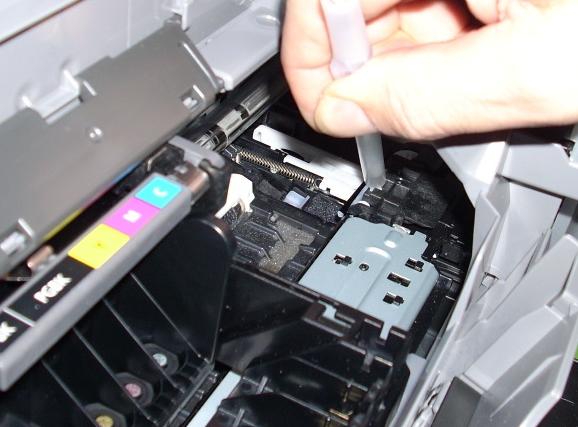
The next photo shows the "wiper blade" being depressed. I was getting a mite frustrated at that point, myself, but I pressed on (so to speak). Directly below the ball-point pen, on a slight angle to the left, is a black line. That's ink on the wiper blade. I thought the white dot at the end of that black line was a small piece of paper stuck inside, but that is the actual color of the blade.
I took paper towels moistened with window cleaner (advice from the above lists) and blotted all the ink off the wiper. I also re-positioned the left pad (the pads are between the pen and the spring).
After more re-tries than I'd like to admit, the yellow blinking light with the 6A00 code pop-up window finally went away! Wahoo! ... Almost.
After trying to get a sample page to print, I got a new error pop-up window that said, "Open the paper tray door." Uh-oh. It was open. This led me to realize I had either not reassembled the printer correctly, or more likely, I broke a tab and/or switch disassembling it.
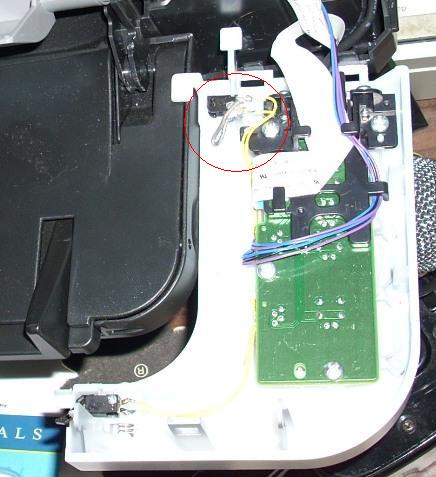
The next photo shows the control panel, with 2 switches circled. The left switch is broken; the right one is whole. I never did find where that tiny piece of plastic toggle went, but its absence was signaling that the barn door was closed.
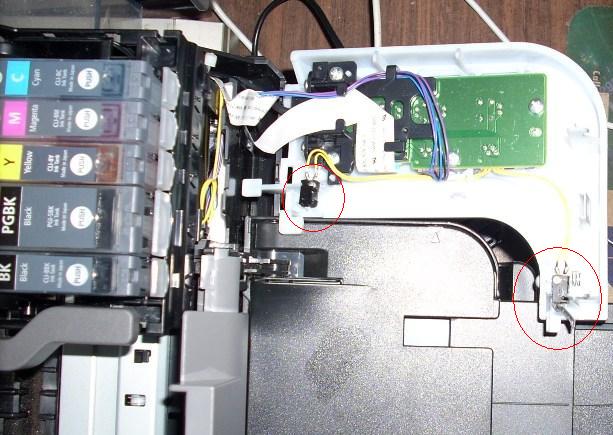
Here's my fix. After thinking that the switch could be replaced, I realized it's pretty easy to see if the door is open or not, and open it before printing. So I grabbed a piece of wire (left over from my grandfather's days with Western Electric, probably circa 1960), and shorted the switch.
Success, at least for a test print.
The volume test will be Kathy's next writing assignment.
Maybe I can order a micro-switch in the meantime.


2 comments:
I really appreciate the kind of topics you post here. Thanks for sharing information that is actually helpful. Good day! Are you not able to fix the problem with the Canon Printer? Just follow the steps which are mention on the blog to Resolve the <a href="https://www.canonprintersupport247.com/blog/fix-canon-pixma-printer-error-code-6a00/>canon printer error 6a00</a> issue. Thanks!
I really appreciate the kind of topics you post here. Thanks for sharing information that is actually helpful. Good day! Are you not able to fix the problem with the Canon Printer? Just follow the steps which are mention on the blog to Resolve the canon printer error 6a00 issue. Thanks!
Post a Comment