However, the cabinet beneath the sink had previously been damaged by a dripping faucet (swelling of the composite wood base and then an elbow sized hole from that repair). So my friend suggested "while you have everything out replace the damaged material". Easy to say, harder to do, since the cabinet was built with the base, then installed, then piped and plumbed, then a dishwasher and disposall added.
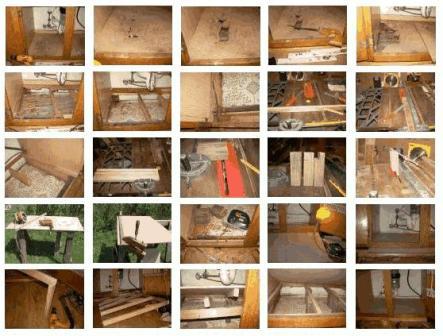
So I bit the bullet. Saturday morning I cut away the warped board, the ribs that formerly supported it, and other soaked fiberboard (first 7 photos). I looked at what was left and realized I needed plywood or what we used to call Masonite, and a new framework to support it. Saturday night after a few hours in the woods at the lodge picnic I was home by 6PM with a 2x4 foot sheet of "MDP" - medium density particle board, but was not alert enough to run power tools safely. I could have tried it, but it seemed safer to wait until morning.
Shot # 8 shows a keyhole saw being used to remove a small piece of oak that sat where I needed to new frame to be.
Sunday morning I select a few "scrap" pieces of "one-by" lumber from the shed; wood left over from other projects, or from furniture that I had torn apart (an old couch and an old porch glider), keeping the sound material. Shots 9-11 show the cross cuts and rips to make the "carcass" that would support the new floor.
As the sides of the cabinet frame are suspect fiberboard, I decided it was unwise to have the carcass from the sides, so I needed some feet. With a large supply of old treated lumber (ex-backyard play set struts), I sliced 6 chunks of 2x4 into piers to support the bridgework of the carcass (shots 14 and 15).
Panel cutting is a pain, particularly when the frame is fixed in place, with existing pipe and wires running through; not to mention a center upright that the 2 doors close against. I set up a pair of saw-horses, inherited from my father, who inherited them from his father. Norm Abrams would do this in his workshop, with a panel cutter he built. But I just clamp a piece of 1x2 on the panel and zip through with a circular saw. In the end, this worked nearly perfectly, except that the target area wasn't square so I ended up with a good fit on one side and a rather tight squeeze on the other. Shots 16 and 17 show the panel cutting. It was the best part of the work, since I was outside on a beautiful summer day.
The remainder of Sunday morning was assembling the ribs and spine of the carcass, cutting away part of the old baseboard to be able to slide the fiberboard into position (shot 18), and putting a few nails into select positions to keep the assembly snug. In the end, it is bowed up about one-eighth inch in the middle above where I wanted it, but the level shows me how much better this really is now than it was yesterday morning.
See http://jspath55.blogspot.com/2008/03/shed-renovation.html for another construction/renovation project of mine.
Oh, almost forgot; I found a dead battery on the Home Depot parking lot -- north side, near the outdoor fence part storage.


No comments:
Post a Comment